×
- Hello
- Login or Register
- Quick Links
- Live Chat
- Track Order
- Parts Availability
- RMA
- Help Center
- Contact Us
- Shop for
- Acura Parts
- Acura Accessories
My Garage
My Account
Cart
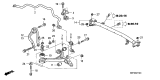
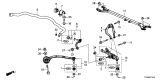
Genuine Acura Control Arm
Suspension Arm- Select Vehicle by Model
- Select Vehicle by VIN
Select Vehicle by Model
orMake
Model
Year
Select Vehicle by VIN
For the most accurate results, select vehicle by your VIN (Vehicle Identification Number).
363 Control Arms found


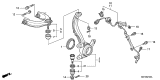
Acura Suspension Control Arm Left Front (Upper)
Part Number: 51460-SEP-A02$186.24 MSRP: $265.98You Save: $79.74 (30%)Ships in 1-3 Business DaysProduct Specifications- Other Name: Arm, Left Front (Upper) ; Upper Control Arm; Upper Control Arm
- Position: Driver Side
- Replaces: 51460-SEP-A01


Acura Suspension Control Arm
Part Number: 51450-SEP-A02$186.22 MSRP: $265.95You Save: $79.73 (30%)Ships in 1-3 Business DaysProduct Specifications- Other Name: Arm, Right Front (Upper) ; Upper Control Arm; Upper Control Arm
- Position: Passenger Side
- Replaces: 51450-SEP-A01


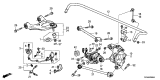
Acura Arm A, Rear (Lower)
Part Number: 52370-TZ3-A40$59.34 MSRP: $82.77You Save: $23.43 (29%)Ships in 1-3 Business DaysProduct Specifications- Other Name: Arm Complete ,Lower-A Rear ; Trailing Arm; Lower Arm, Trailing Arm
- Position: Rear Lower


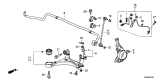
Acura Right Front Lower Control Arm
Part Number: 51350-TV9-A01$186.71 MSRP: $266.65You Save: $79.94 (30%)Ships in 1-3 Business DaysProduct Specifications- Other Name: Arm, Right Front (Lower); Lower Control Arm
- Position: Passenger Side


Acura Front Right Arm (Lower)
Part Number: 51350-TYA-A05$339.49 MSRP: $484.85You Save: $145.36 (30%)Ships in 1-3 Business DaysProduct Specifications- Other Name: ARM, R. FR. (LOWER); Lower Control Arm
- Position: Passenger Side

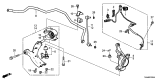
Acura Left Front Arm (Lower)
Part Number: 51360-TV9-A01$186.71 MSRP: $266.65You Save: $79.94 (30%)Ships in 1-2 Business DaysProduct Specifications- Other Name: Arm, Left Front (Lower) ; Lower Control Arm; Lower Control Arm
- Position: Driver Side


Acura Left Front Lower Arm
Part Number: 51360-TYA-A05$339.49 MSRP: $484.85You Save: $145.36 (30%)Ships in 1-3 Business DaysProduct Specifications- Other Name: ARM, L. FR. (LOWER); Lower Control Arm
- Position: Driver Side


Acura Front-Lower Control Arm
Part Number: 51360-TX4-A01$390.95 MSRP: $558.33You Save: $167.38 (30%)Ships in 1-2 Business DaysProduct Specifications- Other Name: Arm Assembly, Left Front (Lower); Lower Control Arm
- Position: Driver Side


Acura Ball Joint Front Lower Arm
Part Number: 51350-STX-A07$463.98 MSRP: $662.63You Save: $198.65 (30%)Ships in 1-2 Business DaysProduct Specifications- Other Name: Lower-Arm Complete ,Right Front ; Lower Control Arm; Lower Control Arm
- Position: Passenger Side
- Replaces: 51350-STX-A04, 51350-STX-A03, 51350-STX-A05


Acura Passenger Rear Lower Suspension Arm
Part Number: 52351-TZ5-A91$203.15 MSRP: $290.13You Save: $86.98 (30%)Ships in 1-2 Business DaysProduct Specifications- Other Name: Arm B, Right Rear ; Lower Control Arm; Lower Control Arm
- Position: Passenger Side


Acura Suspension Control Arm
Part Number: 51450-SJA-013$356.83 MSRP: $509.62You Save: $152.79 (30%)Ships in 1-2 Business DaysProduct Specifications- Other Name: Arm, Right Front (Upper) ; Upper Control Arm; Upper Control Arm
- Position: Passenger Side


Acura Arm Bushing (For Front Upper Control Arm)
Part Number: 51460-SJA-013$356.83 MSRP: $509.62You Save: $152.79 (30%)Ships in 1-2 Business DaysProduct Specifications- Other Name: Arm, Left Front (Upper); Upper Control Arm
- Position: Driver Side


 Product Specifications
- Other Name: Arm, Right Front (Lower) ; Lower Control Arm; Lower Control Arm
- Position: Passenger Side


Acura Front Upper Arm Component
Part Number: 51520-TYA-A01$92.38 MSRP: $129.60You Save: $37.22 (29%)Ships in 1-3 Business DaysProduct Specifications- Other Name: Upper Arm Component, Front; Upper Control Arm
- Position: Driver Side


Acura Left Rear Lower Control Arm (Driver Side)
Part Number: 52356-TZ5-A91$203.15 MSRP: $290.13You Save: $86.98 (30%)Ships in 1-3 Business DaysProduct Specifications- Other Name: Arm B, Left Rear; Lower Control Arm
- Position: Driver Side


Acura Right Front (Lower) Arm B
Part Number: 51350-TY2-A01$371.44 MSRP: $530.48You Save: $159.04 (30%)Ships in 1-3 Business DaysProduct Specifications- Other Name: Arm B, Right Front (Lower) ; Lower Control Arm; Lower Control Arm, Rear Arm
- Position: Passenger Side


Acura Rear (Upper) Arm
Part Number: 52390-SEA-901$148.05 MSRP: $209.12You Save: $61.07 (30%)Ships in 1-3 Business DaysProduct Specifications- Other Name: Arm, Rear (Upper) ; Upper Control Arm; Upper Arm, Upper Control Arm
- Position: Rear Upper
- Replaces: 52390-SEA-013


Acura Rear Passenger Right Rearward Control Arm
Part Number: 52350-TZ3-A00$59.34 MSRP: $82.77You Save: $23.43 (29%)Ships in 1-3 Business DaysProduct Specifications- Other Name: Arm Complete ,Lower-B Rear ; Lower Control Arm; Lower Control Arm, Rear Arm, Upper Arm
- Position: Rear Passenger Side

Acura Lower-A Right Rear Arm Complete
Part Number: 52370-TZ5-A91$54.77 MSRP: $76.38You Save: $21.61 (29%)Ships in 1-3 Business DaysProduct Specifications- Other Name: Arm Complete ,Lower-A Right Rear ; Trailing Link; Torque Arm, Trailing Link
- Position: Passenger Side


Acura Right Front Arm (Upper)
Part Number: 51510-TGV-A53$94.05 MSRP: $131.95You Save: $37.90 (29%)Ships in 1-3 Business DaysProduct Specifications- Other Name: Arm, Right Front (Upper); Upper Control Arm
- Position: Passenger Side
| Page 1 of 19 |Next >
1-20 of 363 Results
Acura Control Arm Parts Questions & Experts Answers
- Q: How to install the front upper control arm on an Acura TL?A:On 2004 and later models, a 6mm x 300mm rod will be needed for upper control arm installation. Begin by loosening the front wheel lug nuts, raising the vehicle, securely placing it on jack stands, and removing the wheel. Support the lower control arm with a floor jack. Next, remove the shock absorber/coil spring assembly and the ABS wheel speed sensor harness bracket from the upper control arm. Remove the cotter pin, then loosen, but do not remove, the castle nut from the upper ball joint stud, using a two-jaw puller or equivalent to separate the ball joint from the steering knuckle. The nut will prevent the upper control arm and the steering knuckle from separating uncontrollably when the parts suddenly pop loose. Separate the upper control arm from the steering knuckle with a two-jaw puller, then remove the nut, ensuring the top of the steering knuckle does not fall outward; secure it with a piece of wire if necessary. Remove the upper control arm mounting bolts, then take out the upper control arm. For 2003 and earlier models, mark the relationship of the upper control arm to the frame before removing the mounting bolts. Installation is the reverse of removal, noting that on 2004 and later models, a 6mm x 300mm rod should be placed in the holes provided in the frame to position the upper control arm, which holds it in the correct position while the arm fasteners are tightened. For 2003 and earlier models, use the reference marks made previously and tighten the mounting bolts while holding the control arm at the proper angle. Ensure the ABS wheel speed sensor harness bracket is installed and the fasteners are tightened securely. Finally, install a new cotter pin after reconnecting the ball stud to the steering knuckle.

Related Acura Parts
 Acura Control Arm Bushing
 Acura Shift Cable
 Acura Ball Joint
 Acura Trailing Arm
 Acura Radius Arm Bushing
 Acura Axle Beam
 Acura Torsion Bar
 Acura Control Arm Bracket
 Acura Radius Arm
 Acura Trailing Arm Bushing
Browse by Model
ADX Control Arm CL Control Arm ILX Control Arm ILX Hybrid Control Arm Integra Control Arm Legend Control Arm MDX Control Arm NSX Control Arm RDX Control Arm RL Control Arm RLX Control Arm RSX Control Arm SLX Control Arm TL Control Arm TLX Control Arm TSX Control Arm Vigor Control Arm ZDX Control Arm