×
- Hello
- Login or Register
- Quick Links
- Live Chat
- Track Order
- Parts Availability
- RMA
- Help Center
- Contact Us
- Shop for
- Acura Parts
- Acura Accessories
My Garage
My Account
Cart
Genuine Acura Integra Brake Light Switch
Brake Lamp Switch- Select Vehicle by Model
- Select Vehicle by VIN
Select Vehicle by Model
orMake
Model
Year
Select Vehicle by VIN
For the most accurate results, select vehicle by your VIN (Vehicle Identification Number).
6 Brake Light Switches found


Acura Integra Stop And Cruise Control Switch Assembly
Part Number: 36750-TY0-J11$19.01 MSRP: $26.52You Save: $7.51 (29%)Ships in 1-3 Business Days
Acura Integra Stop & Cruise Switch Assembly
Part Number: 36750-SE0-013$105.48 MSRP: $147.98You Save: $42.50 (29%)Ships in 1 Business Day
Acura Integra Stop Switch Assembly (Tec)
Part Number: 35350-SE0-A03$36.22 MSRP: $50.52You Save: $14.30 (29%)Ships in 1-3 Business Days
Acura Integra Switch Assembly, Stop (Tec)
Part Number: 35350-SE0-A01$36.22 MSRP: $50.52You Save: $14.30 (29%)Ships in 1-3 Business Days

Acura Integra SW, STOP&CRUISE
Part Number: 36750-T20-A31$23.70 MSRP: $33.05You Save: $9.35 (29%)Ships in 1-2 Business Days

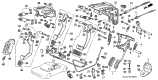
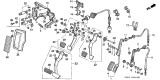
Acura Integra Brake Light Switch
Acura Integra vehicles use the Brake Light Switch to turn on the brake light when the brake pedal is pressed. This mechanism informs those at the back of a car that the car is slowing down or stopping which makes the roads safer for use. Despite the absence of the detailed description referring to various types or styles of the Brake Light Switch for the Integra models, it is pointed out the main function of the switch - to inform other drivers. The efficiency of the brake light switch plays a significant role in relaying information on the road which helps a lot in enhancing the safety of drivers.
We provide a broad range of OEM Acura Integra Brake Light Switch at unbeatable prices on our website. For your OEM parts, You can count on the guaranteed quality, manufacturer's warranty, outstanding customer service, and prompt delivery. We look forward to your visit.
Acura Integra Brake Light Switch Parts Questions & Experts Answers
- Q: How to Inspect the Brake Light Switch on an Acura Integra?A:Push down on the brake pedal to make sure the brake lights light up. Be sure to examine the fuse for brake lights and then look at all tail lamps, including the overhead high-mount light, to make sure their bulbs are working correctly. Take out the switch's electrical connector at the brake pedal's top, then look at the connection between switch pins B and C. When you push down on the pedal, you'll want to see energy travel through the wires; when you lift off the pedal again, the wires should become disconnecte To replace the switch, just pull off the electrical wire, loosen the nut on the pedalside, and undo the switch from its holding bracket. Installation is the reverse of removal. To help the brake light switch work right, loosen its locknut and move the switch back until you see a gap appear between the switch plunger and brake pedalmovement. Turn the pushrod locknut loose and move the pushrod until your brake pedal reaches the correct height with the floor, then close the locknut tight. Push the brake switch down until you press the plunger all the way, then release it 1/2-turn counterclockwise, and tighten the locking nut firmly. Afterwards, push the brake pedal with your hand, check that the brake lights turn on when you press it, and turn off when you let go.
")
Related Acura Integra Parts
 Acura Integra Oil Pressure Switch
 Acura Integra Headlight Switch
 Acura Integra Door Jamb Switch
 Acura Integra Mirror Switch
 Acura Integra Wiper Switch
 Acura Integra Neutral Safety Switch
 Acura Integra Turn Signal Switch
 Acura Integra Back Up Light Switch
 Acura Integra Power Steering Pressure Switch
 Acura Integra Seat Switch
Browse by Year
2026 Brake Light Switch 2025 Brake Light Switch 2024 Brake Light Switch 2023 Brake Light Switch 2001 Brake Light Switch 2000 Brake Light Switch 1999 Brake Light Switch 1998 Brake Light Switch 1997 Brake Light Switch 1996 Brake Light Switch 1995 Brake Light Switch 1994 Brake Light Switch 1993 Brake Light Switch 1992 Brake Light Switch 1991 Brake Light Switch 1990 Brake Light Switch 1989 Brake Light Switch 1988 Brake Light Switch 1987 Brake Light Switch 1986 Brake Light Switch