Contact Us Live Chat or 1-888-505-1906
My Garage
My Account
Cart
Make sure this part fits

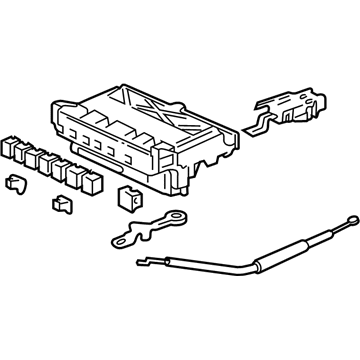
Acura 79500-ST7-A03 Control Assembly, Heater (Air Conditioner)

1998-2001 Acura Integra 79500ST7A03

Customer Questions & Expert Answers (2)
Acura 79500-ST7-A03 Control Assembly, Heater (Air Conditioner)
  • Part Description
    Dash Control Unit
  • Manufacturer
    Acura
  • Manufacturer's Notes
    This part is discontinued.
Make sure this part fits
  • Related Parts
  • Product Specifications
  • Vehicle Fitment
  • Customer Questions & Expert Answers
  • Product Specifications

    BrandGenuine Acura
    Manufacturer Part Number79500-ST7-A03
    Part DescriptionDash Control Unit
    Other NamesHeater Control
    Item Dimensions21.7 x 7.9 x 3.7 inches
    Item Weight1.80 Pounds
    ConditionNew
    Fitment TypeDirect Replacement
    ManufacturerAcura
    SKU79500-ST7-A03
    WarrantyThis genuine Acura part is guaranteed by Acura's factory warranty.
    Shipping & ReturnShipping Policy Return Policy
    Warning: California’s Proposition 65
  • Vehicle Fitment

    Year Make Model Body & Trim Emission & Transmission
    2001 Acura Integra3 Door GS, 3 Door GS-R, 3 Door LS, 4 Door GS, 4 Door GS-R, 4 Door LSKA 4AT, KA 5MT
    2000 Acura Integra3 Door GS, 3 Door GS-R, 3 Door LS, 4 Door GS, 4 Door GS-R, 4 Door LSKA 4AT, KA 5MT
    1999 Acura Integra3 Door GS, 3 Door GS-R, 3 Door LS, 3 Door RS, 4 Door GS, 4 Door GS-R, 4 Door LSKA 4AT, KA 5MT
    1998 Acura Integra3 Door GS, 3 Door GS-R, 3 Door LS, 3 Door RS, 4 Door GS, 4 Door GS-R, 4 Door LSKA 4AT, KA 5MT
  • Customer Questions & Expert Answers

    Q:
    Do you have this part to fit my car? Posted by AcuraPartsWarehouse Specialist
    A:
    You can Select Your Vehicle to check if 79500-ST7-A03 fits your vehicle.
    Posted by AcuraPartsWarehouse Specialist
    Q:
    How do you remove and install the heater control panel on Acura Integra? Posted by Customer
    A:
    To remove and install the A/C Switch in various Honda models, you should first disconnect the negative terminal of your battery, making sure that the vehicle's radio has an anti-theft system with its correct activation code. The method of removal will depend on the specific model and year range: For 1996 through 1998 Civic models what you need to do is remove driver side lower finish panel, glove box and center console lower trim. The hazard light switch, rear defogger switch and stereo must be taken off. Unscrew the screws holding down the center trim panel from the instrument panel, unplug electrical connectors and disengage center trim panel together with the A/C Switch by separating it from the air mix cable. Remove four screws which hold the A/C Switch to the center trim plate to take out the A/C unit. In 1999 and subsequent years Civic models; unscrew bolts fastening the bottom edge of the center trim plate, detach electrical connections from the radio as well as from the A/C Switch along with hazard switchgear. Release clips then pull outward on the center trim plate with attached A/C controls and radio receivers. With Integra models get rid of the hazard light switch or rear defogger switches too. The air mix cable has to be separated from the air mix control arm. Take away two screws holding the central air vent onto the instrument board before separating the central air vent having the A/C Switch still attached. One can remove a heating regulator by means of four screws that are used for attaching it to the central air vent. For CR-V models equipped with manual transaxles, remove the middle console before proceeding towards uninstalling the driver side lower finish panel, glove box, center storage bin, and finally the center console lower finishing. To get rid of either side of the central trim paneling on the instrument board just unscrew two bolts; also combine this operation with removing electric connections between the radio set & A/C Switch which are included into the middle trimming plate. After all these operations you have to take off the center trim panel having this A/C unit together with the radio receiver. The last step is always installation of the removed parts in the reverse order. After installing, start the car engine and check if its heating and cooling system works properly. For temperature control cable adjustment specific steps vary by model but usually it involves disconnecting the cable from either the heater valve arm or air mix control arm under the dash, setting extreme position for temperature control lever, adjusting cable slackness and reattaching cable and clamp as necessary for your particular model.
    Posted by AcuraPartsWarehouse Specialist
    If you have any questions about this product, please don't hesitate to ask us. We will be happy to help you!

Genuine Acura Part 79500-ST7-A03, the Right Choice

To ensure reliability, purchase Acura part # 79500-ST7-A03 Control Assembly, Heater (Air Conditioner). It is sometimes referred to as Acura A/C Switch, Acura Blower Control Switches. When it comes to quality and durability, OEM parts reign supreme. They are manufactured to meet Acura's exacting factory specifications and undergo rigorous quality control. This part fits 1998-2001 Acura Integra.

AcuraPartsWarehouse.com is a leading supplier of genuine Acura parts and accessories such as Acura 79500ST7A03 Control Assembly, Heater (Air Conditioner). Welcome to our website where you can procure brand new OEM Acura parts. We boast a wide array of genuine Acura parts at competitive prices. If you're seeking a combination of quality, reliability, durability, and affordability, you've come to the right place. All our parts are backed by a manufacturer's warranty for your peace of mind.

Why choose Acura Parts Warehouse

  • Dedicated Service

    Your complete satisfaction is our #1 goal

  • Lowest Prices

    Best deals on genuine OE parts from dealerships

  • Fast Delivery

    Orders are processed and delivered promptly