×
- Live Chat
- 1-888-505-1906
My Garage
My Account
Cart
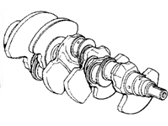
Genuine Acura Legend Crankshaft
Crank Shaft- Select Vehicle by Model
- Select Vehicle by VIN
Select Vehicle by Model
orMake
Model
Year
Select Vehicle by VIN
For the most accurate results, select vehicle by your VIN (Vehicle Identification Number).
5 Crankshafts found


Acura Legend Crankshaft
Part Number: 13310-PH7-020$1125.41 MSRP: $1607.27You Save: $481.86 (30%)Ships in 1-3 Business DaysAcura Legend Crankshaft
Part Number: 13310-PH7-030$1125.41 MSRP: $1607.27You Save: $481.86 (30%)Ships in 1-3 Business Days
Acura Legend Crankshaft
Part Number: 13310-PL2-000$1125.41 MSRP: $1607.27You Save: $481.86 (30%)Ships in 1-3 Business DaysAcura Legend Crankshaft
Part Number: 13310-PL2-010$1125.41 MSRP: $1607.27You Save: $481.86 (30%)Ships in 1-3 Business Days
Acura Legend Crankshaft
We provide a broad range of OEM Acura Legend Crankshaft at unbeatable prices on our website. For your OEM parts, You can count on the guaranteed quality, manufacturer's warranty, outstanding customer service, and prompt delivery. We look forward to your visit.
Acura Legend Crankshaft Parts Questions & Experts Answers
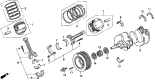
- Q: How to install a crankshaft during engine reassembly on Acura Legend?A: Crankshaft installation is the first major task in engine reassembly, assuming the Engine Block and crankshaft have been cleaned, inspected, and repaired. Position the engine with the bottom lacing up, then remove the main bearing cap bolts and lift out the caps and bridge, laying them out in the correct order for installation. If old bearing inserts are still in place, remove them and clean the main bearing surfaces with a lint-free cloth. Clean the back sides of the new main bearing inserts and place one half with the oil groove in each main bearing saddle in the block, ensuring the tab fits into the recess and the oil holes align. For V6 engines, install thrust bearings in the number three position, while for four-cylinder engines, they go in the number four position, with oil applied to the contact surfaces. Clean the bearing faces and crankshaft main bearing journals, checking the oil holes for dirt. Once the crankshaft is clean, lay it in position in the main bearings and check the main bearing oil clearance using Plastigage, placing it on each crankshaft main bearing journal. Clean the bearing faces in the caps, install them in their respective positions with arrows pointing toward the front, and carefully lay the main bearing cap bridge in place without disturbing the Plastigage. Apply a light coat of oil to the bolt threads and under sides of the bolt heads before installing and tightening the main bearing cap bolts in three steps without rotating the crankshaft. After removing the bolts and lifting off the main bearing caps, compare the width of the crushed Plastigage to the scale on the envelope to determine the main bearing oil clearance. If the clearance is not as specified, check for dirt or oil between the bearing inserts and caps or block, and if the Plastigage is wider at one end, the journal may be tapered. Scrape off any traces of Plastigage material, then lift the crankshaft out, clean the bearing faces in the block, and apply a thin layer of moly-base grease or engine assembly lube to each bearing surface, including the thrust washers. Lubricate the crankshaft surfaces that contact the oil seals, ensuring the journals are clean before laying the crankshaft back in place. Install the Pistons and Connecting Rods with the engine block positioned so the crankshaft is at the top, then install the caps and bridge with arrows pointing toward the front, ensuring the thrust washers are installed. Apply a light coat of oil to the bolt threads and under sides of the bolt heads, starting the bolts by hand, and tap the ends of the crankshaft to align the thrust washer and crankshaft surfaces before tightening all bolts to the specified torque. Rotate the crankshaft by hand to check for binding, then check the crankshaft endplay with a feeler gauge or dial indicator, ensuring it is correct if the thrust faces are not worn or damaged and new thrust washers are installed. Finally, install a new rear main oil seal and bolt the retainer to the block.